Carving Pumpkin Ideas

Carving Pumpkin Ideas - Kirikou and the Sorceress
Halloween, pumpkins and fall make autumn fun and special. Time to carve those pumpkin lanterns but are you stuck for new carving pumpkin ideas for Halloween? Want a more grown up and sophisiticated pumkin for your Halloween party? How about making a Kirikou and the Sorceress pumpkin lantern? Scary for the kids but chic for the adults.
The story and pictures created by Michel Ocelot, and are so beautiful that adults will love them every bit as much as children - always a winner with me. The witch from Kirikou and the Sorceress must be one of the scariest and most beautiful witches in children's literature, and as far as carving pumpkins go, Michel Ocelot has already done the work for you and made a powerful image that is just perfect for a pumpkin lantern.
Here's how to carve a pumpkin, or at least how I set about carving mine. You don't have to use Kirikou's Sorceress; using the same technique, you can carve a pumpkin with any image you choose - including your own designs.
All content and images, unless otherwise attributed, are the property of Barbara Walton
I Took My Pumpkin Pattern from Kirikou et La Sorciere - But you can choose any Halloween image

Make Your Pumpkin Carving Pattern
In five simple steps
How to Make a Pumpkin Carving Pattern in Three Tones
Dark, light and mid-tone
I had been looking at pictures of carved pumpkins on the internet, and pumpkin carving patterns for them and I was enthused! When we were children we carved simple faces by cutting out rough shapes. The ones I saw on the net were intricate, funny, beautiful and inspiring! I wanted to do the same.
I was cautious, however, and decided to keep the first one simple. I would divide my design into three areas.
1. Fully pierced
2. Half cut - part of the thickness cut away so that the light could shine through
3. Not cut at all
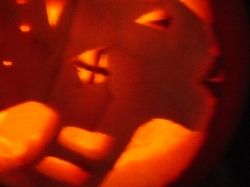
You can see this on the detail. To the right is the uncut pumpkin shell. Also left uncut is the cross of the earing, the centre of the eye and the lips. Where it is uncut the light will not shine through.
The parts of the pumpkin which are totally removed shine bright. These areas are around the head, the inside of the earing, the whites of the eye and the rings on the neck.
In the face area I cut away the skin of the pumpkin, and shaved away some of the thickness of the flesh, allowing the light to glow through giving the image an intermediate tone.

Step 1 - Draw or Find Your Ideal Halloween Picture
At the size that you want it on your pumpkin
You can draw it freehand, trace it from a book and blow it up by scanning it and saving it as an image.
You can trace it from an online image after you've saved it as a picture and then zoomed in to achieve the correct size. I found this one in Google images for example.

Step 2 - Trace or Copy Your Image
Use baking paper
Trace the image that you want to use. It doesn't have to be too detailed as you are going to have to cut all this with a knife, (unless you invest in some state -of-the-art pumpkin carving tool!)
Try to make sure that you have all the elements in the drawing that you want to incude in the final design.
Mine looked a bit like this.

Step 3 - Work Out Your Carving Pattern
Shade in or colour the three layers
Next you will need to translate this drawing into a pumpkin carving design. You will have to think carefully to ensure that it will work when you start to cut the pumpkin. Make sure that you will not end up cutting out your design!
Look at the diagram to the right. If you draw the circles on the left, and then you cut out the white area, your central orange circle will simply fall out! You will need to cut the outer white circle in parts, leaving supports for the inner circle. These must be strong enough to hold the central circle in shape.
It seems self-evident when shown here, but in a complex design it becomes very tricky!
This is How I Worked Mine Out - Shading in the three different areas

I worked out the areas, making sure that the design would work in terms of:
- cut
- don't cut
- thin out
Remember not to make it too fiddly if you're a beginner. The smaller cut out areas in the hair I planned to pierce using skewers.
(Can you spot the 'deliberate' error?)
How To Carve Your Kirikou Pumpkin
Step 4 - Prepare Your Pumpkin
Cut off the lid and empty the contents
Cut a nice lid in the top of the pumpkin, large enough for you to get your hand into. Angle the knife towards the centre of the pumpkin, so that the lid will fit back inside if you want.
Scoop out the seeds and put to one side to use as nibbles, or to grow your own pumpkins for next year. Then start scooping out the flesh with a sturdy spoon. It's quite hard work. You would want the pumpkin wall to be about 1" or 2cm thick. Keep the flesh to make pumpkin soup.
What to Do With Your Fall Pumpkin Flesh and Pumpkin Seeds - Try out these pumpkin recipes
Don't waste your Halloween pumpkin! Not only are pumpkin seeds tasty little snacks, but they are good for you. They are a natural way to keep your system clean and get rid of parasites.
- What to Do With Pumpkin Guts
Great gut ideas - Roasted Pumpkin Seeds
Roast those pumpkin seeds - Five Great Pumpkin Recipes
Five delicious ideas for all that pumpkin flesh - Best Pumpkin Seed Recipe Ever
You've just got to take a look!
Step 5 - Transfer the Design to Your Pumpkin
And carve out your pattern
You can carefully carve out the 'cut' areas of your diagram with scissors or a blade, put the paper onto the pumpkin in the correct place. Mark all four corners of the paper. Draw around the cut out shapes in felt tip pen onto the pumpkin. Remove the paper and cut these shapes out of the pumpkin with a sharp knife.
Then cut out the 'thin out' areas of your paper diagram. Again, place the paper onto the Carefully remove the skin from your next area and shave off the pumpkin flesh until you have reduced the thickness to about half.
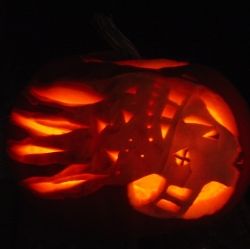
And that is all there is to it! (In reality it's quite a skilled job but I managed mine first time. You'll get better and be able to make more sophisticated designs .... like this one).
Carving Pumpkins on eBay - Get Your pumpkin carving kit here
I used a kitchen knife and scalpel, plus a skever or two but you might like to invest in a pumpkin carving kit. Bid for your kit here on ebay. Good carving!
Need More Pumpkin Carving Inspiration? - Makes carving pumpkins look easy!
A more sophisticated pumpkin carving pattern to tackle once you've succeeded with a simpler one like mine. Good pumpkin carving!
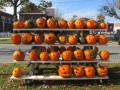
These Carved Pumpkins are Really Awesome
- 26 Amazing Halloween Carved Pumpkins Plus Pumpkin Facts and How The Name Jack o' Lantern Came About.
Some great facts and a fascinating story!
Watch Kirikou and the Sorceress on DVD
![Kirikou and the Sorceress [DVD]](https://m.media-amazon.com/images/I/51JN0X1899L._SL160_.jpg)